Web Extensions made with Angular
In this blog post I want to show how you can create WebExtensions for modern web browsers like Firefox, Chrome, Opera or Edge using the new Angular framework (i.e. Angular version 2 and above).

The WebExtensions API
In the past, each web browser provided its own way of creating extensions (also called browser add-ons or plugins) to add functionality to the web browser – if extensions were supported at all. In Firefox for instance, you had to use XUL to create extensions. In 2015, however, Mozilla announced to deprecate the old way of building extensions and switch to a new extension API called WebExtensions. This step has been criticized by many users and developers, since Firefox had accumulated a rich pool of useful extensions over the years. However, the new API has several advantages over the old ways of building extensions:
First, it is more or less compatible across multiple browsers. This makes it easy for developers to create extensions that can be used with all popular browsers. Instead of learning different technologies, you only need to get acquainted with the WebExtensions API. Have a look at the browser compatibility tables to see which parts are already implemented by the different browsers. Second, developing web extensions is even easier since the new API is based on the standard web technologies JavaScript, HTML and CSS. You don’t need to learn another syntax or markup language like XUL. The WebExtensions docs on MDN explain everything very well and are a great reference. The new API has also some other advantages like improved security and being able to operate in a multi-process environment.
Creating WebExtensions with Angular
Since WebExtensions are based on standard web technologies, you can resort to many existing frameworks and libraries for client side web applications when creating such web extensions. Here I want to show that it might be even feasible to use the new Angular framework (i.e. version 2 and newer) for creating a web extension.
This is the result of a little coding experiment I did when I wanted to build – or rather re-build – a web extension for storing bookmarks using the Pinboard service. If you don’t know Pinboard, you may want to read the review I posted this month. It is a really useful bookmark manager, and it also provides a web API for storing bookmarks that can be accessed by web apps or browser extensions.
Actually Pinboard does already provide an official extension for Firefox and other browsers. However, the official Firefox extension is still using the old XUL technology, so that it will stop working in Firefox in about a year when Mozilla will not support it any more, and I also found that it was annoyingly slow. Storing a bookmark should be a quick process – I don’t want to wait several seconds for loading a web form. One of the reasons for the sluggishness of the official web extension is that it does not cache the list of tags that are provided as suggestions. My idea was to use the Web Storage API of WebExtensions to cache this list, so that it doesn’t need to be retrieved newly for every link you want to add.
It seems other people had similar ideas, since I found an unofficial Firefox add-on called Pinboard+ which already did pretty much what I wanted and had been created using the WebExtension API. This Firefox extension was actually a port of Chrome extension called Pinboard Plus. But unfortunately, the Firefox port was not based on the latest version of Pinboard Plus and did not work reliably for me, and also fixing the bugs turned out to be not so easy since the extension was based on the old AngularJS (version 1.2), jQuery and Underscore.js libraries, which I felt made the code a bit convoluted and hard to maintain.
So I decided that it would be a good exercise to re-write Pinboard Plus as a modern Angular application using no additional libraries (well, of course Angular itself requires a few other libraries internally such as RxJS). I called this new extension Pinboard Pin and published the source code on GitHub. This rewrite was also intended as a proof-of-concept that modern Angular is a viable platform for building web extensions.
Of course, the Angular framework might be considered an overkill for building a simple web extension. But my simple Pinboard Pin extension already contains three forms with several input fields, uses validation and an auto-suggest feature for tags, and communication with the Pinboard API over HTTP, which are all things that are easy to implement using Angular.
After Angular 5 has been released in November 2017, I revisited this project and found that the new version of Angular and other development tools made this approach even more feasible and enjoyable. This article has been updated to account for these improvements and remove now unnecessary workarounds.
One notable feature of the new Angular framework is that applications are now written in TypeScript. When using an IDE or an editor that supports TypeScript and assists you with “intellisense,” writing application code is a much more pleasant experience and less error prone than the usual way of writing JavaScript without type hints. As an IDE for writing Angular applications, check out Atom, Visual Studio Code and WebStorm. If you want to write Python code as well, PyCharm might be the best solution since it does not only support Python, but also TypeScript and everything else you need for frontend web development.
Thanks to Michael Zapata we now also have type definitions for the web extensions API. All you have to do is install web-ext-types as an npm module and add it to the tsconfig.json configuration file provided by the Angular CLI:
"typeRoots": [
  "node_modules/@types",
  "node_modules/web-ext-types"
],
Peculiarities of WebExtensions
Actually, the Angular framework is primarily targeting so-called “single page applications” (SPAs), i.e. applications which are based on a single HTML page. Therefore the Angular CLI produces a single HTML page, usually called index.html. Now WebExtensions are not exactly SPAs, but pretty similar.
One difference is that instead of a single page, WebExtensions feature different kinds of starting pages. The default popup that opens when clicking on the button of the browser extension must be specified as the property default_popup of the browser_action object in the manifest.json file. Since we only have one HTML page, we must specify it here:
"browser_action": {
 "default_title": "Pinboard Pin",
 "default_icon": {
    "32": "/img/pinboard_idle_32.png",
    "64": "/img/pinboard_idle_64.png",
 },
 "default_popup": "/index.html"
}
We need to tell the Angular CLI that it must add the manifest.json file that describes the web extension to the web browser and other necessary files from our src directory to the dist directory when it builds the web extension. This can be achieved by setting the assets property of the apps object item in the angular-cli.json configuration file:
"apps": [
  {
    "root": "src",
    "outDir": "dist",
    "assets": [
      "img",
      "js",
      "manifest.json"
    ],
    "index": "index.html",
    "main": "main.ts",
    "test": "test.ts",
    "tsconfig": "tsconfig.app.json",
    "prefix": "app",
    "styles": [
      "styles.css"
    ],
    "scripts": [],
    "environmentSource": "environments/environment.ts",
    "environments": {
      "dev": "environments/environment.ts",
      "prod": "environments/environment.prod.ts"
    }
  }
]
The img directory contains the icons in various sizes and variations (highlighted and normal), and the js folder contains a “content script” that can be injected into the current page in order to retrieve its title, description and keywords. These are then used to pre-populate the input fields of the form for bookmarking the page.
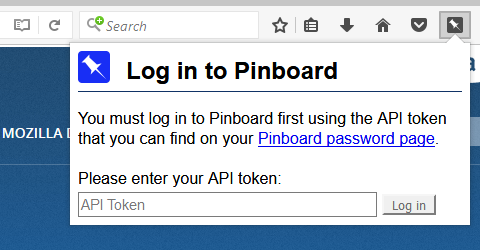
In order to communicate with the Pinboard API, we need the user’s Pinboard API token. If the token has not yet been stored in the local storage area of the extension, we first need to show a login dialog that requests it from the user:

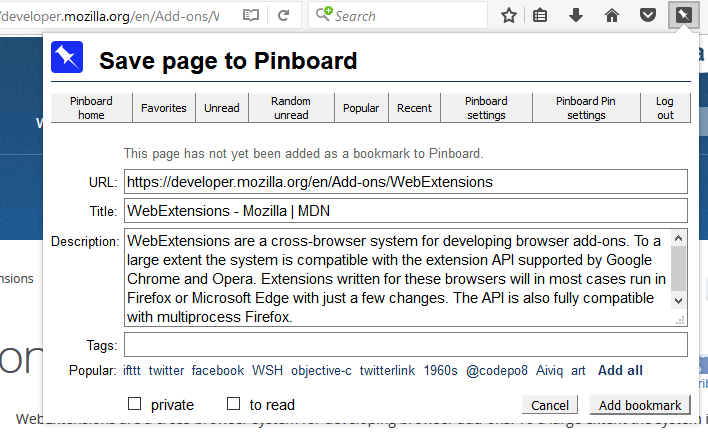
Only after the user has entered the API token and it has been validated, we want to show the actual popup for storing the current page as a bookmark:

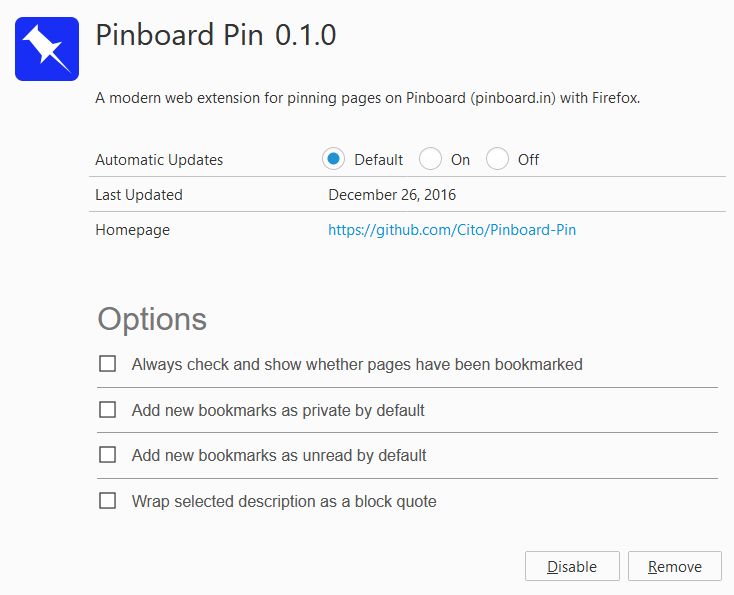
This can be easily solved with a so-called “guard” in Angular. We can use the same guard not only as an authentication guard, but also for navigating to the other pages that are part of our WebExtension. One of them is the options page showing a form where you can change the settings of the add-on:

This options page must be specified as the property page of the options_ui object in the manifest.json file. Unfortunately, the Angular CLI creates only one index.html page for us, and it cannot be easily configured to provide an additional options.html page. But luckily, Firefox allows passing query parameters to the options page:
"options_ui": {
  "page": "/index.html?page=options"
}
So we simply use the Angular router to navigate to the options page by checking a query parameter in our guard for the default route. The code for the guard therefore looks like this:
@Injectable()
export class Guard implements CanActivate {

  constructor(private pinboard: PinboardService, private router: Router) {}

  canActivate(route: ActivatedRouteSnapshot,
              state: RouterStateSnapshot): Observable<boolean>|boolean {

    const page = route.queryParams['page'];

    if (!page || page === 'popup') {
      return this.pinboard.needToken.pipe(map(needed => {
        if (!needed) {
          return true;
        }
        this.router.navigate(['/login']);
        return false;
      }));
    }

    this.router.navigate(['/' + page]);
    return false;
  }

}
Setting up the Angular router
To use the authentication guard, we can define our app routes like this:
const appRoutes: Routes = [
  { path: 'login', component: LoginComponent },
  { path: 'options', component: OptionsComponent },
  { path: 'background', component: BackgroundComponent },
  { path: '**', component: PinPageComponent, canActivate: [Guard] }
];
As you see, the default path is guarded. The guard only returns true when no page query parameter is specified and we already have the API token. In this case, the route is activated and the PinPageComponent is shown, which is the main dialog for bookmarking a page with Pinboard. Otherwise, the guard blocks the route by returning false and navigates to the /login path instead. This path is not guarded and shows the LoginComponent which is the dialog for entering the API token. Finally, if a page query parameter has been specified, the guard also blocks the default route and navigates to the specified page instead. For the options page, it navigates to /options which displays the options form with the settings shown above.
In the app routes above there is another route for a background page that we haven’t talked about yet. A background page can be used for long-running background tasks. In the Pinboard Pin extension, it is used for always checking via the Pinboard API whether the active tab is already bookmarked in Pinboard and highlighting the Pinboard icon if this is the case. This is one of the additional features that can be enabled on the options page. Actually, you would only need a background script for this purpose, not a background page, but navigating to a page with a BackgroundComponent in the way described above seems to be the easiest way to have TypeScript and the Angular service machinery available when doing our background work. In the ngOnInit() method of the component, we add a listener for the tabs.onUpdated event that requests the Pinboard API for the URL of the updated browser tab and sets the icon accordingly. The background page can be specified in the manifest.json file like this:
"background": {
  "page": "/index.html?page=background"
}
Creating Angular services for web APIs
The guard and the components of the Pinboard extension inject a PinboardService for storing and updating Pinboard bookmarks and suggesting tags using the Pinboard API. This service in turn uses the built-in Http client and a StorageService that is a thin wrapper around the WebExtensions storage API. The latter is used to translate the Promises used by the WebExtensions API to Observables, which are used everywhere else in this Angular application, so that the asynchronous operations can be more smoothly combined.
Here is the code for the crucial part of the Pinboard service:
const apiUrl = 'https://api.pinboard.in/v1/';

@Injectable()
export class PinboardService {

  constructor(private http: HttpClient, private storage: StorageService) { }

  // get an object via the Pinboard API
  httpGet(method: string, params?: any): Observable<any> {
    params = params || {};
    if (!params.auth_token) {
      return this.storage.get('token').pipe(switchMap(token => {
        if (!token) {
          Observable.throw(new Error('No API token!'));
        }
        params.auth_token = token;
        return this.httpGet(method, params);
      }));
    }
    params.format = 'json';
    const httpParams = Object.entries(params).reduce(
      (params, [key, value]) => params.set(key, value), new HttpParams());
    return this.http.get(
      apiUrl + method, {params: httpParams});
  }

  // get bookmark with the given url
  get(url): Observable<any> {
    return this.httpGet('posts/get', {url: url, meta: 'no'});
  }

  // ...
}
The httpGet() method is a universal method for communicating with the Pinboard API. It first checks whether the necessary API token has been provided as part of the parameters. If no, it requests the StorageService to get the API token from the local storage of the browser extension. The API token is then added to the parameters and the httpGet() method is called again. This time the request is sent via the Http client, and the decoded JSON object in the response is returned.
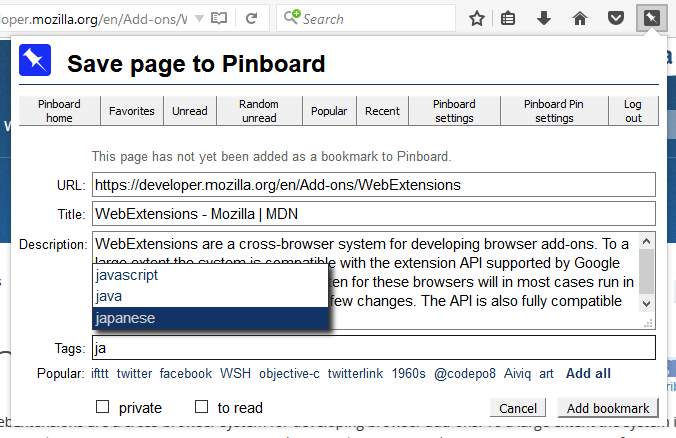
The reactive extensions used in Angular are very convenient for combining the various asynchronous operations. They are particularly handy for implementing the auto-suggest feature that suggests suitable tags from Pinboard when entering text in the tag input field:

Here, we can make good use of the debounceTime() and distinctUntilChanged() operators on the Observable that reports the keyboard events on the tag input field, since we don’t want to check the suggested tags too frequently.
Building the web extension
For development, you can build the extension with the Angular CLI using the command
ng build --aot
The --aot option evokes Angular’s “ahead of time compiler”. The build process compiles, transpiles and bundles all the TypeScript modules, Angular templates and CSS into a few files that can be loaded and executed by the web browser, primarily main.bundle.js, containing the code of your application, and vendor.bundle.js, containing the library code that is required by Angular. It also creates source map files which are useful for debugging the extension. You can load the extension into Firefox by navigating to the URL about:debugging, clicking on the button “Load Temporary Add-on” and then selecting any file in the dist folder that Angular CLI has built. You can also reload and debug the web extension using the corresponding buttons on the about:debugging page.
Even better, you can use the web-ext tool. When you run this tool in the dist folder, it loads the extension, watches the dist folder for any changes, and reloads the extension automatically. This is very convenient during development.
When you want to ship the extension, you add the --prod option in order to build an optimized version with minified bundles. This option also evokes the tree-shaking functionality that further reduces the size of the bundles by removing unused code. You should also add the --sourcemap=false option in order to suppress the creation of the source map files, and add the --output-hashing=none option in order to suppress the creation of cache-busting hashes:
ng build --aot --prod --sourcemap=false --output-hashing=none
Older versions of the Angular CLI also produced gzipped versions of the bundles, which you should remove because they are of no use when packaging the application as a web extensions. The Angular CLI (or actually webpack) normally also adds random “chunk hashes” to the names of the various bundles it creates in production mode. These are useful for invalidating the browser cache when you deploy a web application. But for web extensions, they are not necessary, since these come with their own version number and do not live in the browser cache. These hashes are also obstructive for the Mozilla add-on review process, since the hashes can be different when the extension is built in another environment. The review process however requires a reproducible build output. Luckily, newer versions of the Angular CLI allow configuring the creation of these hashes and switching them off completely with --output-hashing=none, as explained above. So you don’t have to resort to hacking the webpack configuration or repackaging the bundles without hashes as I did earlier.
In order to finally package everything up into a distributable zip archive, you can again use the web-ext tool:
web-ext build --source-dir=dist --artifacts-dir=.
Note that the build command of the Angular CLI by default creates JavaScript code that is backward compatible with ECMAScript 5, in order to support older browsers. But since we target the latest versions of Firefox specifically, which already supports ECMAScript 6 (ECMAScript 2015) and even newer ECMAScript standards pretty well, it makes sense to create ECMAScript 2015 or even ECMAScript 2017 code instead, thereby reducing file sizes and making the execution of the code more efficient. In order to do this, you must set target="es2017" instead of target="es5" in the configuration file tsconfig.json in the src directory. This works pretty well with the latest version of the Angular CLI. The current version of the extension is now 30% smaller than the first version, created with Angular 2 instead of Angular 5 and an old Angular CLI version that only supported target="es5". Newer versions of Angular and its “ahead of time compiler” also provide other features that reduce the size of the build artifacts, like “tree shaking” and removing whitespace from Angular templates.
The last step is to let Mozilla sign your web extension. This is now required in order to make the extension permanently installable in the Firefox browser. Signing is done through addons.mozilla.org (AMO). You have two options: Distributing your web extension as a “listed” add-on on AMO, or distributing it yourself via a web page or application installer. The good news is that now it’s also possible to use both options, so you can pre-release web-extensions to beta users without having these versions listed or reviewed on AMO. This mitigates the problem that getting your web extension reviewed as a listed add-on can take quite a while – particularly when it has been created as a packed and minified bundle with the Angular CLI. This is because the reviewers need to check the source code and replicate the build step to verify the output is the same, and there are only a few reviewers who do such source code reviews. In my case it took over a month to get the Pinboard Pin extension listed reviewed. However, I believe this was also due to the winter holidays, and I assume in the future the review process will become smoother.
One particular hurdle for getting web extensions reviewed still needs to be mentioned: The bundles created by the Angular CLI contain some code that produces warnings when checked with web-ext lint, because this code violates the content security policy (CSP) used by Firefox for web extensions. In practice, these warnings can be ignored and the code runs just fine even under the pretty strict default CSP. So even though it is possible to relax the policy using the content_security_policy setting in the manifest.json file, this is not necessary. But these warnings might make it difficult to get your web extension reviewed and accepted. I hope that Mozilla finds ways to make submitting Angular web extensions and getting them reviewed easier in the future, and that the Angular CLI provides ways to remove the problematic code from the created bundles.
All in all, using the new Angular framework turned out to be a viable option for creating web extensions that can be time-saving and convenient when developing extensions with a somewhat sophisticated or complex UI, and the latest versions of Angular made this option even more attractive.